For any company, payroll accounting is a big deal. QuickBooks accounting software comes to the rescue while calculating the payment of employees. However, QuickBooks catches few errors in different circumstances of operation. Neglecting these issues will have negative consequences. QuickBooks error 15107 is one of the issues that occur when upgrading or installing QuickBooks payroll updates. This problem displays the message "QuickBooks error 15107: The payroll cannot be initialised."

If you are experiencing the same issue and seeking solutions, you have come to the right place. This blog post will assist you in resolving the mistake and operating the QuickBooks software efficiently.
What may cause the QuickBooks error 15107?
There are various reasons why payroll error 15107 appears on a computer screen while updating QuickBooks accounting software. Even small mistakes can trigger the error. Before looking to rectify the errors, it’s important to know the root causes. Here we have mentioned a few major reasons are as:
- Windows operating systems and QuickBooks are outdated
- Payroll files and registry entries are corrupted or damaged
- QuickBooks are not installed properly
- The computer is attacked by malicious activities and viruses.
- In some instances, third-party applications run behind the screen and can disrupt the QuickBooks operation
- If there is no internet connection
- Firewall and security settings were not configured properly and might block the connection.
Solutions to Fix the QuickBooks error 15107
Now you are aware of what QuickBooks error 15107 is and the factors that trigger the problem. And you are set to try for troubleshooting methods. However, before that make sure to follow the instructions without any mistakes.
Method 1: Execute reboot.bat file
- First close QuickBooks Desktop software.
- Right-click on the QuickBooks icon on your desktop screen
- Select "Properties" from the menu.
- Click on "Open File Location."
- In the top right search field, type "reboot" or "reboot.bat."
- Once you find the file named "reboot" or "reboot.bat," right-click on it.
- Choose "Run as administrator" from the context menu.
- Click on "Yes."
- Now restart your computer to apply the changes
- Relaunch the QuickBooks Desktop
- If it asks to install an update, select "Update Now."
- If the error continues, go to the next troubleshooting method.
Method 2: Run QuickBooks clean install tool
- First install the QuickBooks clean install tool.
- Select QuickBooks Clean Install Utility.exe.
- Now Open the setup file
- A permission box will appear; click "I accept" to agree to the license agreement.
- Select the "Continue" button.
- Click on "OK" to finalize the process.
Method 3: Install a Digital Signature Certificate
- Go to the following path on your computer: C:\Program files (x86)\ Intuit\QuickBooksXX
- Type "QBW.exe" in the search bar.
- Right-click on the QBW32.exe file from the displayed list and select "Properties."
- From QB32 properties find the digital signature lists.
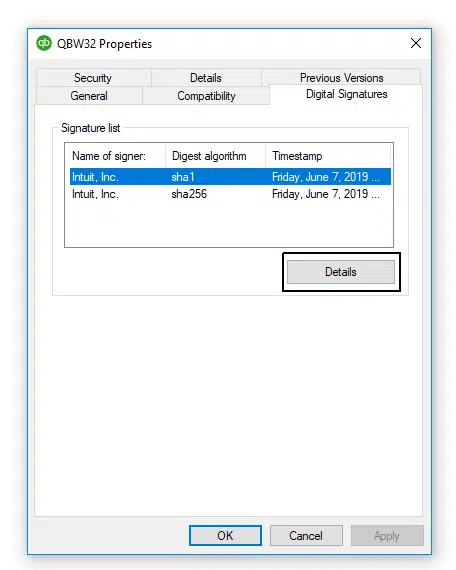
- Select "Intuit" from the list of digital signatures.
- Click on the "Details" tab.
- Choose the "View Certificate" tab and click on the "Install Certificate" option.
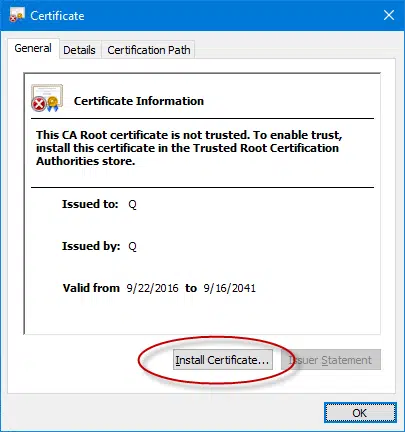
- Install the certificate for QuickBooks.
- Click on the "Finish" tab to complete the process.
- Reboot the system to apply the changes.
- Now once again download the update to check if the issue has been resolved.
Method 4: Install QuickBooks File Doctor tool

- Run the QuickBooks File Doctor tool.
- Browse to select the company file
- Click on "Check your file and network."
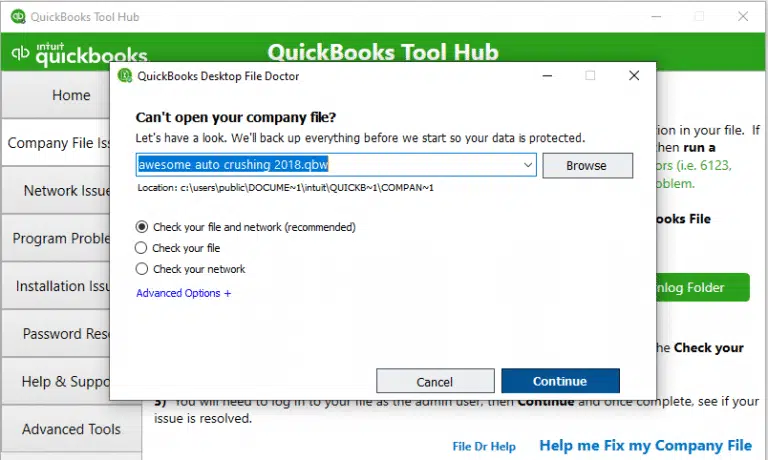
- Then, click on "Continue."
- Enter the QuickBooks Admin password and go to the next step.
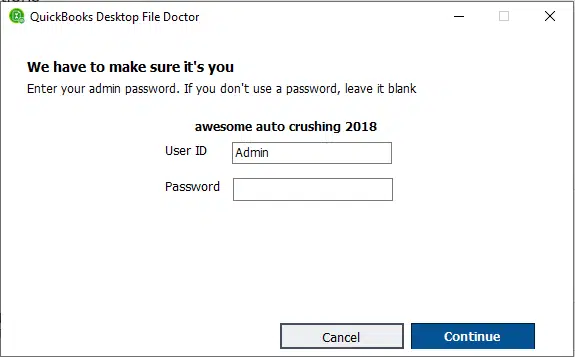
- The scan will begin, and it may take some time
- Once the scan is complete, your issue should be resolved. If not, try for the next solution.
Read More…!!


)
)
)